Just like me, you’ve probably noticed that holding your didgeridoo while playing quickly becomes tiring! You switch arms to rest the other one. You try holding the didgeridoo closer or further from the mouthpiece. And if your instrument happens to be too heavy, you may even end up with wrist or back pain. Anyone who has experienced this quickly understands the value of a didgeridoo tripod! Not to mention that it can be used both seated and standing. And if you add a bit of DIY improvement to that, you’ll quickly end up with a versatile and affordable stand.
For all these reasons, I wanted to share with you how I use my didgeridoo tripod, as well as the modifications I’ve made to it.
Underground Cosmic Didges, where I play with Julien
First of all: where can you buy a didgeridoo stand?
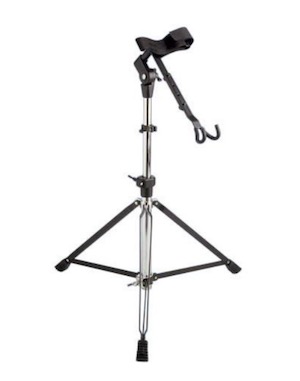
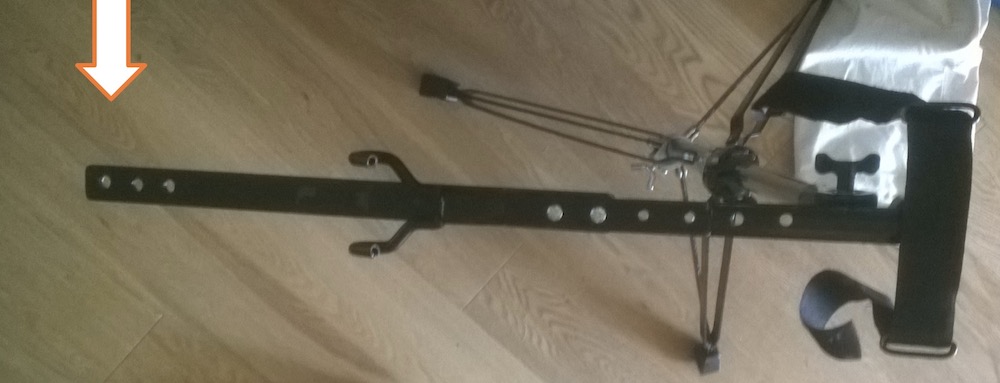
As you might expect, the first step is of course to get a stand! At the time, the only solution I found was to buy a djembe tripod. I therefore own a model from the brand Stagg that looks like this:
You can order it from:
Of course, Stagg and Meinl don’t have a monopoly on this type of stand, and you’ll easily find other brands offering equivalent products. There are even stands specifically designed for didgeridoo! You can find one on the Didgeridoo Passion website, a tripod that Greg adapted for the didgeridoo, which explains its higher price. I haven’t had the opportunity to test it yet, but you can count on me to share my opinion when the time comes!
[EDIT] Thanks to Vincent and Jaime for also mentioning this even cheaper tripod on MusicStore, which however requires a few modifications to be fully adapted to the didgeridoo (something didgeridoo-passion has already done for you—so it’s up to you to decide whether you’re into DIY or not!).
Some modifications to the didgeridoo tripod
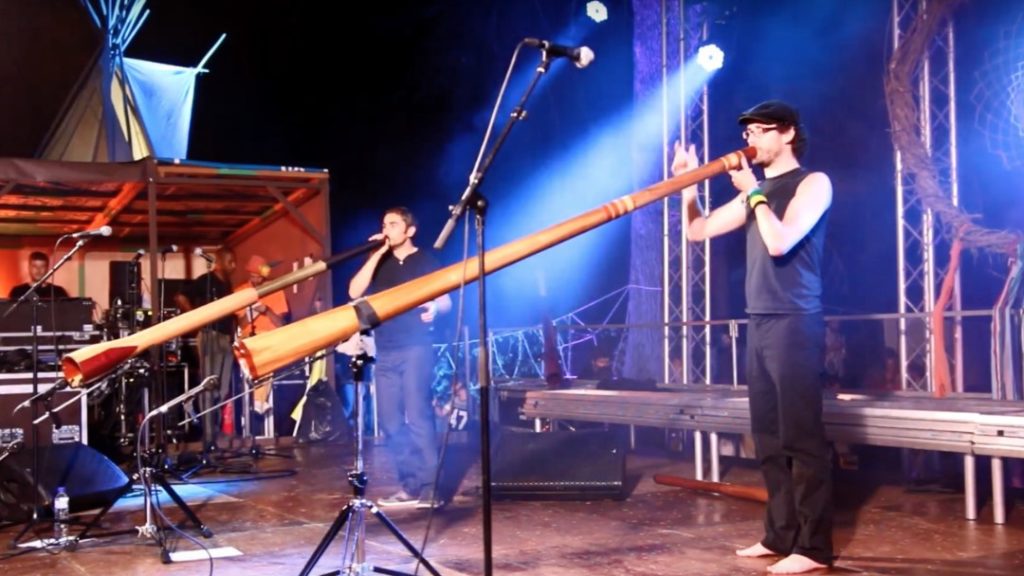
As for me, I wanted to be able to play standing up (with my hands free) while still having a right/left range of motion, in order to create better stage dynamics. So once the stand was purchased, a bit of DIY was necessary!
1 . How to freely pivot your didgeridoo left/right
Most tripods don’t allow the didgeridoo to pivot. Once fixed, the instrument no longer moves. So I had to work around this technical constraint with a few adjustments.
On my model, a tightening collar was locking the top part of the stand to the bottom part. You can either remove it or flip it and position it at the desired height (it’s up to you to adapt it depending on the tilt you want, your height, and the length of your didgeridoo).
The tightening screw must remain loose to allow the upper part to pivot easily. A small tip to help it slide smoothly: oil it if necessary.
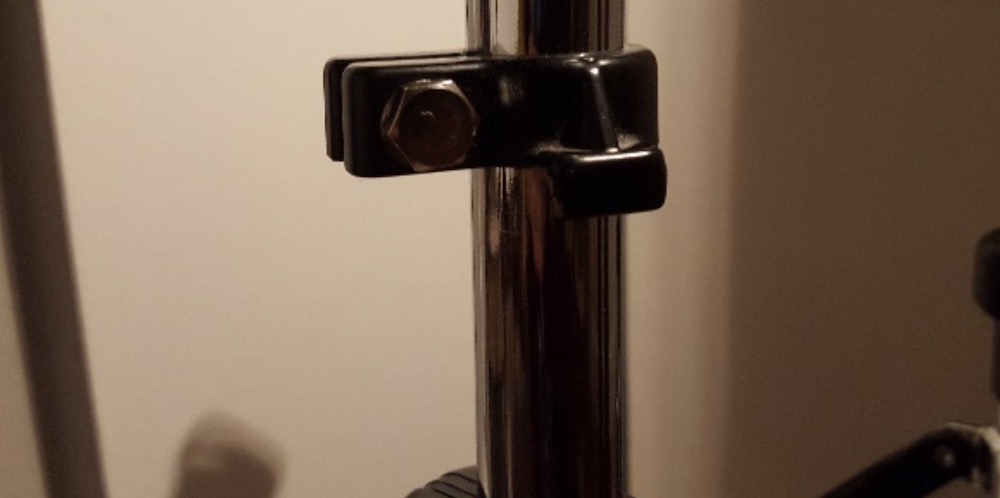
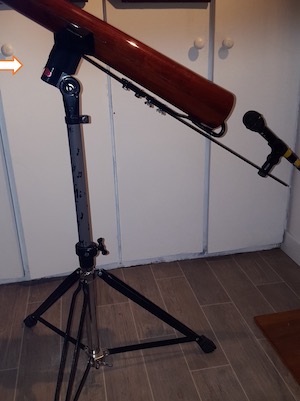
Photo taken before flipping the tightening collar
Mounting a microphone directly onto the didgeridoo stand.
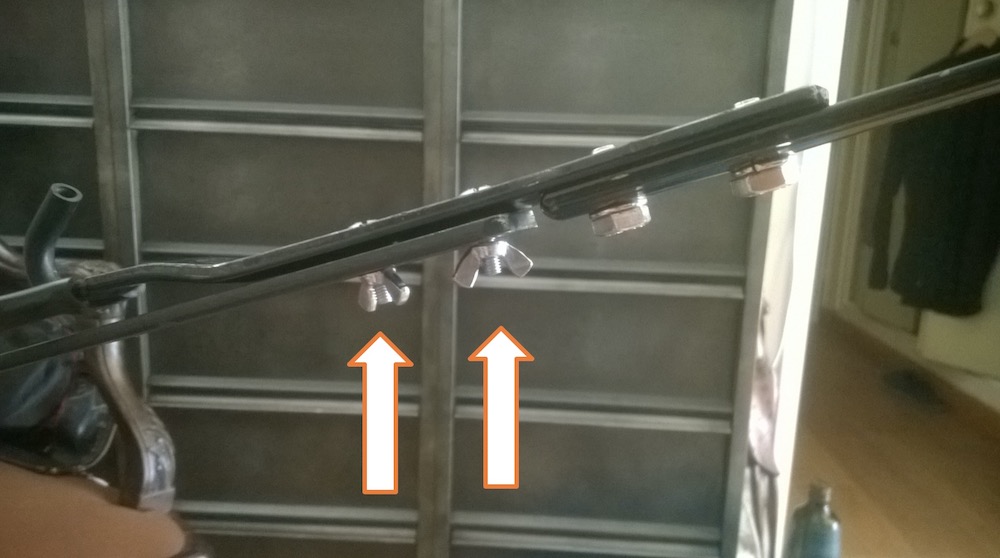
Due to its design, the tripod already has a metal extension to hold the didgeridoo by its bell. This works well as is, but it’s too short to mount a microphone. So I added a metal bar to extend it. This flat iron bar measures 45 cm long and 3 mm wide. You can find this type of material in hardware stores. Once installed, it serves as a microphone support.
Everyone has their own way of attaching it to the tripod. I’ve seen some players use heavy-duty tape or even bicycle inner tubes. Personally, I drilled the bar and used wing nuts. These are very practical for quick assembly and disassembly.
Once the bar was installed, I found two ways to mount the microphone:
- The first, and simplest, is to buy a “table microphone clamp”. You can find them between €5 and €20. This solution allows you to adjust the microphone at any distance from the bell.
- The second solution is to drill the bar. By doing this, you allow a nut for a microphone clip to pass through (€1). You can also ensure the microphone angle is perfectly aligned with the bell by using a lock nut (€1). To position the microphone closer or further from the bell, you can drill several holes in a row (see photo). I particularly favor this solution because it’s lightweight and economical.
Easily adjusting your tripod to different didgeridoo lengths
Like most players, I play several didgeridoos. I’m therefore faced with another issue: variations in instrument length require changing the tilt of the tripod so that the mouthpiece stays at mouth height.
My tripod has a notched tilt system, which makes it difficult—or even impossible—to quickly fine-tune the position this way alone, especially during a concert.
To avoid these issues, the optimal solution would be to have one stand per instrument. But I won’t even mention the weight, bulk, and transport constraints of carrying a stand for each didgeridoo!
Fortunately, there’s a clever tip shared by Colas Testu (also read: Already 3 generations of didgeridoo players in France!).
First, with your tripod in its lowest position, you need to set the tilt for your longest didgeridoo. This will be your base tilt setting, and it won’t change anymore.
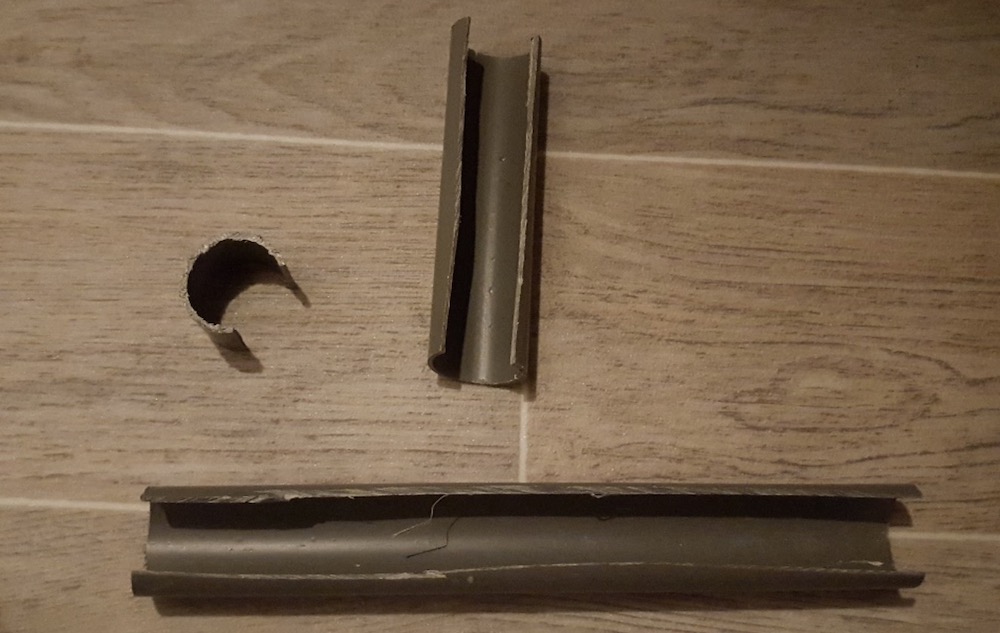
For all your other instruments, you’ll simply need to add spacers (ring-shaped shims) on the stand extension to adjust the height for each didgeridoo (thanks Colas!).
These spacers are made from 32 mm diameter PVC, available in hardware stores. One ring is needed per note. They can be cut into a C-shape so they can be clipped on and off, as shown in the photo below.
It’s simple to make and the adjustment is very precise. Thanks to this method, you keep full freedom to pivot your didgeridoo on its axis.
As for me, it works for most of my didgeridoos: from my E up to my A (2.60 m) (also read: Which note should you choose to start playing the didgeridoo?). The only downside is that you need to make an adjustment for each change of note, but it’s quick and efficient.
And hop—another video from a live performance featuring didgeridoo tripods
As you’ve probably noticed, every player has their own tips and habits when it comes to organizing their practice! I’ve shared what I use to have a comfortable and versatile stand, and I’d be curious to hear your feedback and tricks!
Feel free to share them in the comments—it’s a great way to pool our ideas!


9 Responses
Hello !!
MERCI beaucoup pour cet article qui répond parfaitement à ce dont j’ai besoin. J’ai un trépied car j’essaye de jouer de l’accordéon chromatique en même temps. J’ai un woodslide, un didg à coulisse qui me permet de pas être limité dans mes tonalités. Du coup lorsque je change de tonalité, je dois changer la hauteur et l’inclinaison du trépied, en fonction de la nouvelle longueur du didg. j’ai galéré, puis j’ai utilisé un marqueur indélébile pour marquer mon trépied, tant dans la hauteur que dans l’inclinaison. Mais ça s’efface à la longue. J’avais aussi pensé à la solution des tubes en PVC à vrai dire, mais là ça achève de me convaincre ! Bref tout ça pour dire : merci de ce post ultra concret !
Merci pour cet article !
Merci à toi Adrien pour ton article.
Et merci également à Jaime et Vincent pour vos ajouts.
C’est clair que d’avoir un trépied permets de se libérer de la contrainte de le porter.
Cela permets, du coup de pouvoir utiliser ses mains pour par exemple jouer d’un autre instrument !!
Tout à fait Karl, il y a la mobilité gauche droite pour la dimension scénique mais l’un des usages premiers du trépied est de pouvoir manipuler d’autres instruments (batterie, loop, shakers ….) et là le mode fixe suffit.
Je partage le lien de Vincent Pinson…
Pour 40€ frais de port compris on dispose d’un super pied de Didge pro….
Voici un lien vers les modifs possibles de ce pied….
La communauté des joueurs a déjà pas mal expérimenté ses possibilités (dérouler le post vers le haut) :
https://community.wakademy.online/t/ou-trouver-un-support-pour-son-didgeridoo/494/32?u=jaime
Jaime à raison, le forum est le lieu idéal pour aller plus loin dans le partage d’expérience.
Merci pour tous tes partages ???
Salut, merci pour ton poste. Pour ceux qui on un petit budget j’ai trouvé ce trépied :
:https://www.musicstore.com/fr_FR/EUR/Fame-pied-Djembe-DJS9000-/art-DRU0020014-000
A 39 euros imbattable, il est tout en métal et très robuste, ça ne sens pas le cheap.
Et pour le problème de crans, moi j’ai opté pour un limage des crans et puis j’ai mit au centre une rondelle en caoutchouc pour assurer le serrage. Très rapide à mettre en place.
merci
Salut Vincent, merci pour ton partage. En effet, les idées doivent pouvoir s’appliquer plus ou moins à d’autres type de support pour djembé. Sur la photo tu tiens cela semble possible de mettre des bague pour pivoter gauche droite par exemple.
En voyant la photo cela m’évoque deux autres astuces que je n’ai pas mentionné dans l’article:
* Protéger le didg des rayures à cause des visseries : j’ai mis des patins de meuble pour cacher les vis.
* Éviter les couinements du didg sur les crochets plastiques qui étaient repris par le micro lors des mouvements haut/bas : 2/3 tours de sparadrap sur les crochets