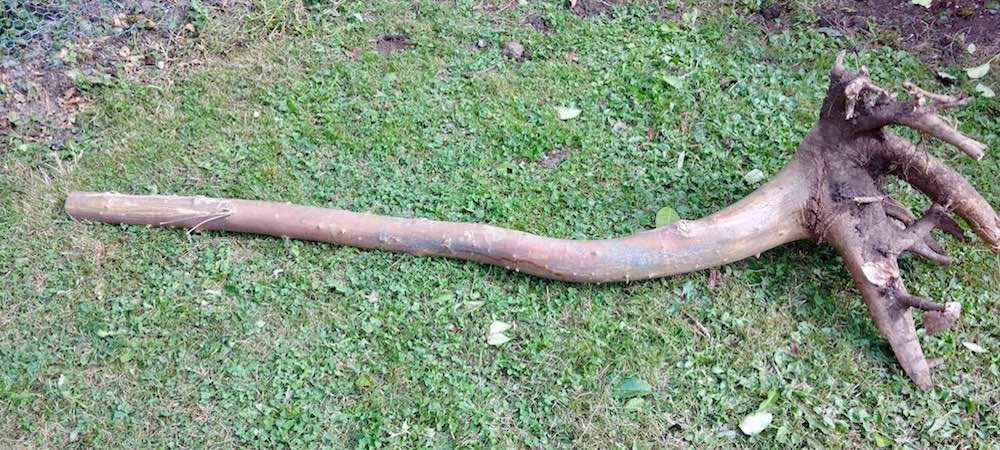
We cannot say that the eucalyptus trees dug by termites run through the forests in our latitudes! And it is precisely for this reason that for a few years now many didgeridoo players have decided to make their own instruments. The principle is simple: split a branch into two parts, hollow out the latter and glue everything back together. Like that, doesn’t it look silly ?! The principle is indeed basic, but you will see that the experience of the manufacturers could well enlighten us on the errors to be avoided! Over the years, this technique has proven itself. It is not uncommon to come across a player with an instrument that he has created himself. In any case, much more frequent than a violinist who would have made his violin!
The didgeridoo definitely has more than one trick up its sleeve.
Happy are the simple pieces of wood
The didgeridoo has indeed a big advantage for him: it is an instrument of a simple form. So obviously, if you are a bit of a handyman, the idea of making one quickly comes to mind. Well, sure unless you’re excessively good, you won’t get a high-end didgeridoo the first time around, but you will at least have something to have fun with for quite a while. The trick is to respect a few basics to make sure that your didgeridoo will ring a minimum.
So, how do you go about creating your didgeridoo? What types of wood to choose? What form to give it? What size ? To all these questions, I will try to provide you with answers!
Step 1: Which species of wood to choose for your didgeridoo?
It sounds silly like that, but no branch, no didgeridoo! You will therefore have to provide you with raw materials. And this is certainly the most important step in the process. Indeed, not all woods sound the same. Certain essences will indeed be much more gifted than their neighbor for music.
Forget the softwoods for your didgeridoo!
These antlers are far too light to make a good didgeridoo. Forget pine, fir and spruce, even if this can vary, the density of conifers that we find in our region is often very low: from 0.40 to 0.50. Obviously, it is tempting to make an instrument as light as air, but this will have unfortunate consequences on the sound (especially on the bass). To go further, you can read my article on the psychology of a didgeridoo . Keep in mind that a didgeridoo must have a minimum of weight and density to claim a balanced sound.
Instead, go see the hardwoods, they are more suited to the didgeridoo!
It is then towards deciduous trees that we will turn, quite simply because we find them with good densities in our forests. Thanks to Jethro who posted a topic on francedidgeridoo.com . This information will greatly help us to have an overview of the densities of the different woods.
Very light 0.40 to 0.50
Poplar
Aspen
Lime tree
Light 0.60 to 0.65
Birch
Elm
Ash
Plane tree
Soft beech
Walnut
Chestnut
Light heavy A 0.65 to 0.80
Mulberry
Hawthorn
Medium heavy B 0.65 to 0.80
Oak
Hard beech
Hard ash
Fruit woods
Acacia
Sycamore maple
Heavy 0.80 to 1
Charm
Cormier
Boxwood
Olivier
Holly
I deliberately deleted the woods that were not easily found in our latitudes in order to make the table more readable.
Very light category (0.40 to 0.50)
These may be hardwoods, but they are nonetheless too light (like conifers). We will therefore not choose them to make our didgeridoo. We want it to ring in the cottages!
Light category (0.60 to 0.65)
The use of woods in this category is often mentioned in the testimonials of manufacturers of herbs. Normally if you follow well you will be surprised that we use wood with a rather light density ?! Yes it’s true… The density remains low here. Keep in mind, however, that these densities are only indications and may vary depending on the conditions in which the tree has grown. A dry climate will give a denser tree, conversely in a humid climate.
However, at the risk of positioning myself alone against everyone, I think that one of the big faults of current sandwiches is precisely their weight. Many amateur (and professional) manufacturers would benefit from leaving more material or using a little denser wood. In my opinion, this is one of the aspects that could easily be improved. The sound is much more stable with material.
To conclude, most of the wood in this category comes from common trees and therefore easy to find. Despite my previous argument, if you find this type of gasoline go for it. Because by shaping it the right way, it will sound much better than your PVC tube! Over the years, I settle down a bit and I become more and more demanding. Don’t listen to me all the time and keep your beginner soul. If a piece of wood inspires you, give it a go!
Light Heavy Category A (0.65 to 0.70)
If you can make a didgeridoo with a mulberry tree then well done, you have a nugget here. Needless to say, mulberry trees will have a trunk much too small to make a didgeridoo, but Hawthorn produces trunks that can reach an interesting diameter. In view of its density, Hawthorn is a wood to keep in mind.
Light heavyweight category B (0.70 to 0.80)
Many of these woods are of particular interest to us. With the exception of oak, whose acoustic qualities are not wonderful, other species such as fruit trees, beech, ash and maple are especially valued in the manufacture of didgeridoo. I highly recommend them to you.
Heavyweight category (0.80 to 1)
There, we are in the heavy of heavy! These four essences often sound very good. A boxwood with the right diameter will be difficult to find. You may want to cut one off discreetly as you walk around … But please don’t. A boxwood grows between 10 and 20 centimeters per year, it may take 20 years to reach a suitable size for an instrument. Boxwood didgeridoos are very rare. If you come across a fallen tree then you can give it a try. Otherwise, fall back on more common essences that will sound great.
List of species to favor in the manufacture of a didgeridoo
Here is the selection of woods that will almost certainly give you a great sound! You will notice that there is still a good bunch of them! Be careful, the more you increase in density, the more difficult the wood will be to dig. Density has to be paid for!
Light 0.60 to 0.65
Birch
Elm
Ash
Plane tree
Soft beech
Walnut
Chestnut
Medium heavy 0.70 to 0.80
Hard beech
Hard ash
Fruit woods
Acacia
Sycamore maple
Heavy 0.80 to 1
Charm
Boxwood
Olivier
Holly
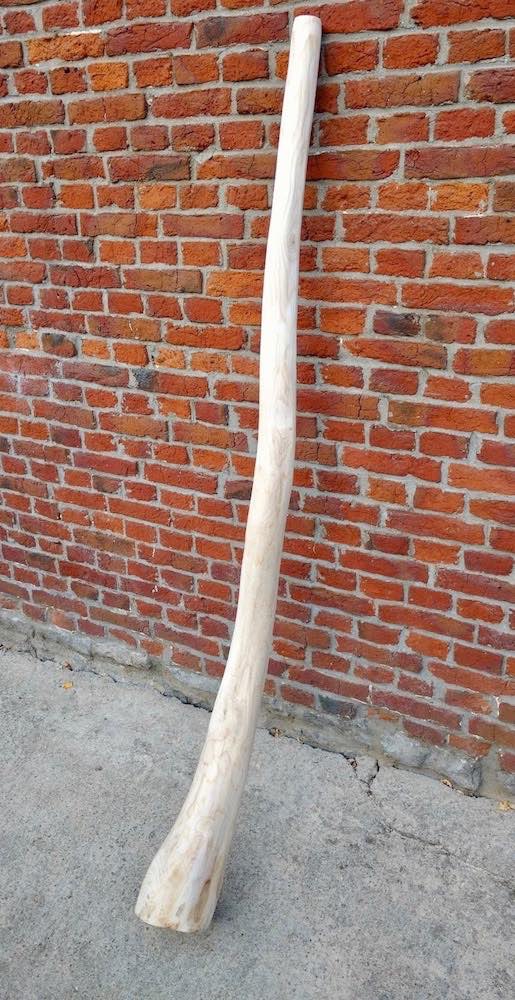
Step 2: the dimensions of a balanced didgeridoo
At this point you have your branch. It’s time to think about the shape of your didgeridoo. Logically, you will tell me that it depends on the shape of your branch! It’s not wrong (cuckoo Perceval). However, if I can give you a piece of advice: keep some leeway.
Let me explain.
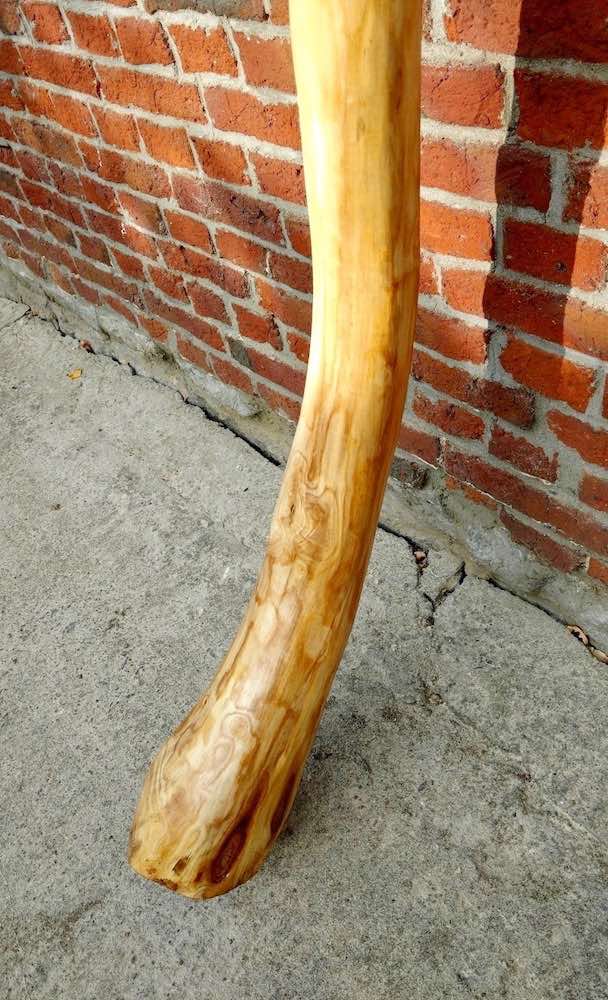
The outer diameter
Often the diameter is one of the traps of the first sandidg (this is what we call a didgeridoo made in this way). We go on a very thin branch. I had done that also with my first instrument. If I dare say « instrument »! I had taken a very thin branch. Then I cut it, dug it (very very very!) Badly, then glued it back together. The didgeridoo was just not a didgeridoo. It had so many splinters inside that it was worse than a teak or a eucalyptus hollowed out by the screw. A very bad job what, in addition to a diameter far too thin.
When you choose your branch, take a minimum diameter of 70 mm at the mouth and 110 mm at the bell. It is much more interesting to have too many diameters than not enough. If, once dug, your didgeridoo has too much wood, you can remove it. Which is not possible, you will agree, otherwise.
The inner diameter: the air column
Here is an example of the dimensions to apply to the mouthpiece and the bell to ensure you have a balanced didgeridoo. Please note that I am talking about the interior dimensions of the air column here.
For the mouthpiece, aim around 40mm. To put it simply, the more you open the air column at the start, the more round the sound will be and conversely, the more you will shrink it, the more dry and dynamic the sound will be. Find this information in the article of the 4 criteria of a didgeridoo . As for the bell, don’t make it too big. This is useless and will deteriorate your sound. An internal diameter of 90mm looks very good.
Finally, for the size of the instrument, choose a length between 1m40 and 1m60.
Of course, these are only indications, do not all go to make an instrument cloned on these dimensions! If your branch doesn’t exactly match the dimensions, that’s okay. There are much more serious things in life, like climate change or even running out of dark chocolate on a winter evening huddled by the fire, herbal tea in hand.
With such dimensions, you make sure you have a didgeridoo that will sound.
Yes, but on condition that you follow the last two tips below.
Tips 1: Think of your didgeridoo as a third party
I could not say where this story of thirds comes from, but it is something now admitted in the world of the didgeridoo: a didgeridoo is thought (at least) in three thirds.
Concretely, measure your trunk, divide its size by three, this will give you three thirds (so far that’s fine!). Draw them on your branch to clearly delineate the sections. If you’ve read my articles (haven’t you read them?), You are aware that a didgeridoo is a clever mix of conical and cylindrical shape. We will therefore have to think of these thirds in a conical or cylindrical shape. Depending on the pattern chosen, this will significantly change your sound. To summarize, here are four possibilities that your didgeridoo could be inspired by.
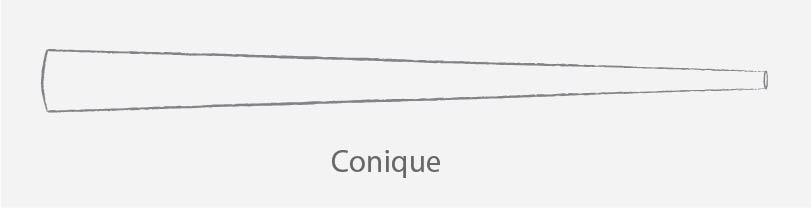
Diagram 1 – 100% conical didgeridoo
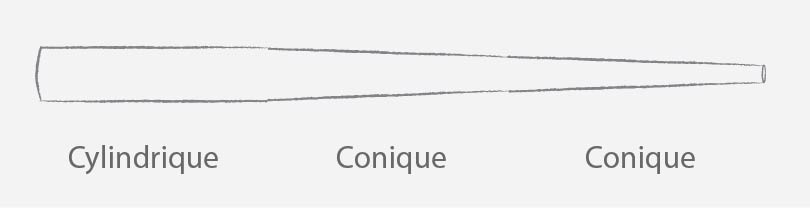
Diagram 2 – 1/3 cylindrical + 2/3 conical
Diagram 3 – 1/3 conical + 1/3 cylindrical + 1/3 conical
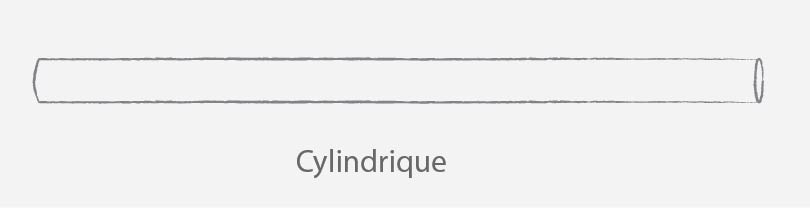
Diagram 4 – 100% cylindrical didgeridoo
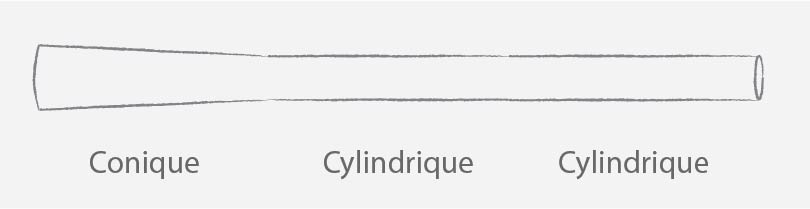
Diagram 5 – 1/3 conical + 2/3 cylindrical
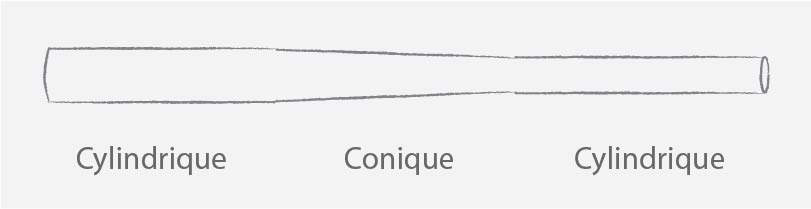
Diagram 6 – 1/3 cylindrical + 1/3 conical + 1/3 cylindrical
As you will have understood, all the subtlety will be to vary the conical / cylindrical aspect more or less on each third.
Fellow researchers, rejoice, because these are years of research available to you! Nonetheless, if I can save you some time, making a purely conical or cylindrical didjeridoo is never very good. To ensure you have a first ringing didgeridoo, avoid the first two diagrams.
Tips 2: Take care of the interior of your didgeridoo
We often see didgeridoos with a rather neat exterior. They are beautiful to see. But we are disillusioned once we take a look inside… The wood is roughly hollowed out, the collages are not clean, the finishes are not very elaborate.
Even if you are not a great handyman (for my part I can not say anything, given the state of my first test !!) and the finishes bother you, try to make a clean interior all the same. The smooth appearance of the inner wall of your didgeridoo will give it a clear and smooth sound. The vibrations can spread further.
Another defect related to the interior is the shape of the air column. It is not a question here of the famous thirds, but rather of the diameter of the air column. Try to make the diameter as round as possible and not too oval. After all, an oval diameter is a conical / cylindrical shape, but in the other direction of the cut… I don’t know if it’s very clear my business… In short, try to dig a round diameter and not an oval!
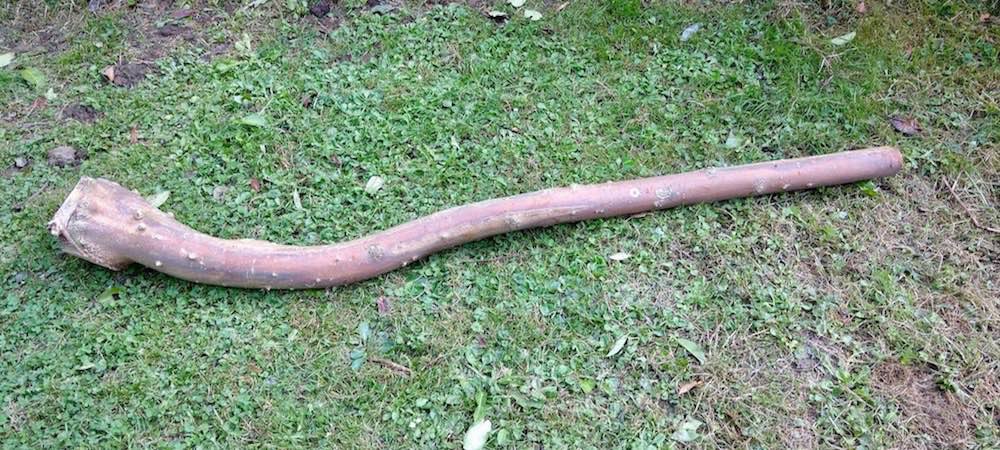
The steps of making a homemade didgeridoo
You are still here ?! Owl ! After all that, here are the few steps that will allow you to see globally the making of a didgeridoo sandwich. Thanks to Christophe Versieux, a Belgian didgeridoo player, for the photos of his didgeridoo!
Step 1 – The choice of the branch (or the trunk!)
Step 2 – Cleaning the trunk
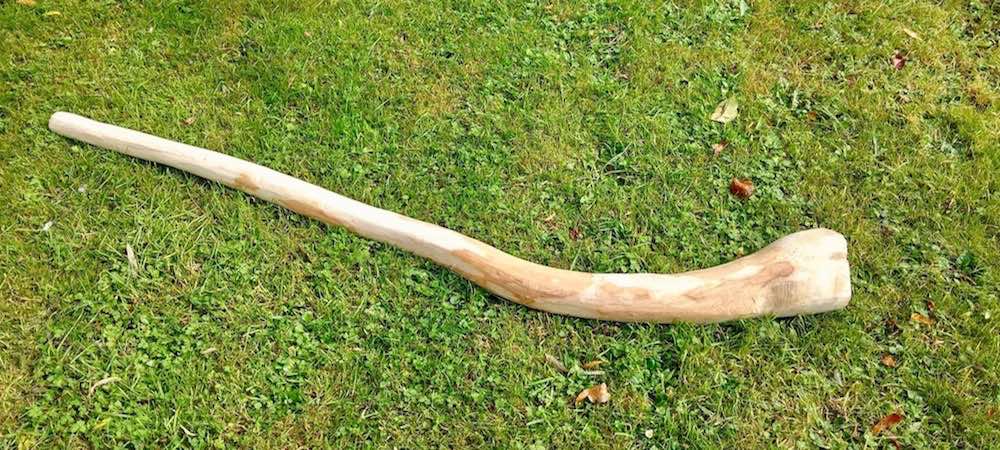
Step 3 – debarking the trunk
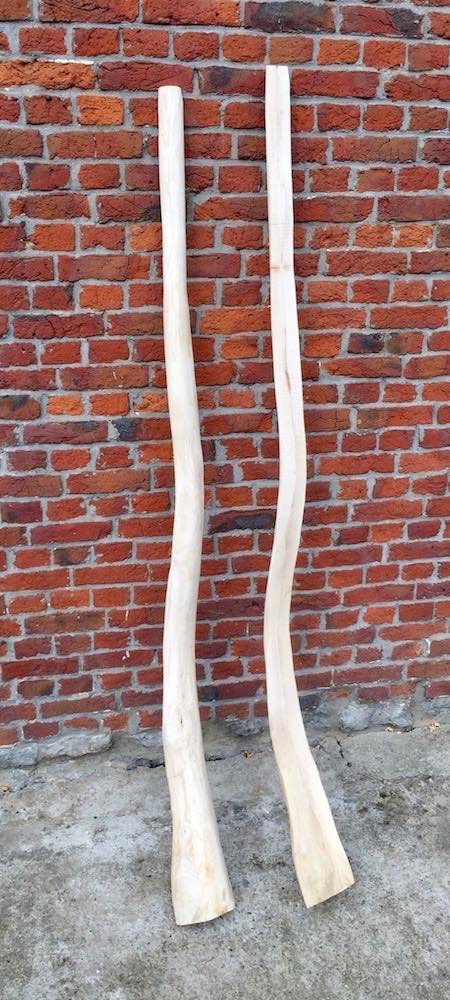
Step 4 – The « didgeridoo » is cut in half

Step 5 – Both parts are hollowed out
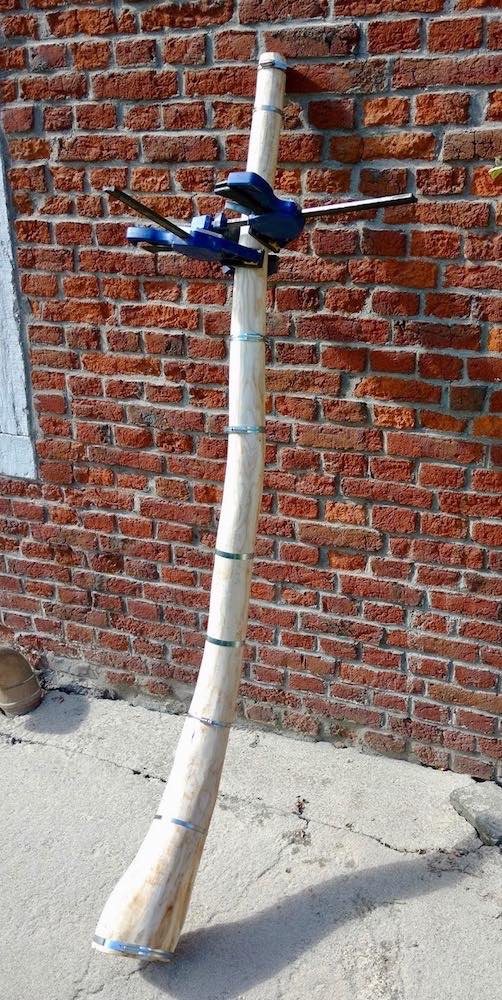
Step 6 – Gluing the didgeridoo with a gasket
Step 7 – Stuck Didgeridoo!
Step 8 – The varnish and it’s done!
Conclusion: Take action and make your own didgeridoo!
So ready to make your own didgeridoo? If you are interested, you will find on the website of Biolodidg (Stephane Bouillet), all the steps and concrete advice to make your didgeridoo. From debarking and finishing to what kind of glue it recommends, you should find something to make your didgeridoo unhindered. And if the article has you more, comment and share. It’s great to have your feedback!