



A few months ago I discovered DidgMo, a free software developed by Hanspeter Portner that lets you model the inside of a didgeridoo. You can then see the frequencies of your future instrument and anticipate its acoustic qualities!
As we know, a didgeridoo boils down to a tube. A more or less complex tube, sure, but a tube. Now physics and mathematics, with their precise formulas, can help you find out the note of your future didgeridoo… and much more! But you still need to know how to use these formulas and combine them. Luckily, there is a free and open source software, developed by Hanspeter Portner, that pulls off this feat. A big thank you to him for all the time he must have spent on it. So in this article I’m going to show you how DidgMo can help you design a didgeridoo that sounds great!
But before that, back to where it all started: Franck Geipel
Credit where credit is due. When it comes to calculating the frequencies of a didgeridoo by computer, it all starts with Frank Geipel, a German player. He developed a very powerful software: CADSD (Computer Aided Didgeridoo Sound Design). I don’t know if he created it alone, but his software seems to be ruthlessly precise. Among other things, it was used to design Dan Flynn’s didgeridoo in this video:
Dan flynn playing at the InDiginus festival
I had heard about Franck Geipel’s software for several years without paying much attention to it. Back then I wasn’t very interested in didgeridoo making (I guess things change ;-)). Unfortunately, Frank decided not to sell his software. He surely has his reasons, and his website talks a lot about the physics of the didgeridoo. Just like the book “The didgeridoo Phenomenon“, which he partly wrote and which is fascinating. I recommend reading it, by the way: it is far richer than this article (unfortunately it is only available in English or German).
However, as much information as there is, it doesn’t replace computer design software. And that’s where our famous DidgMo comes in! Hanspeter Portner explains that he wanted to reproduce Frank’s software in a free and open source way. He introduces his approach and his sources on this page. Needless to say, DidgMo is certainly far less polished than Frank’s work, but it can already do a lot. I should point out that I haven’t yet been able to check the software’s accuracy by going all the way to making the didgeridoo. But what I have seen looks very consistent and promising.
Overview and practical guide to DidgMo
First of all, DidgMo is available either online, or on Mac or Windows. Personally, I use and recommend the online version because it doesn’t need any installation (the Mac and Windows versions require third-party software to run).
The DidgMo design page
The DidgMo interface is basic but effective. You’ll find an explanatory text giving brief instructions on how to use the software (I go over them here in more depth).
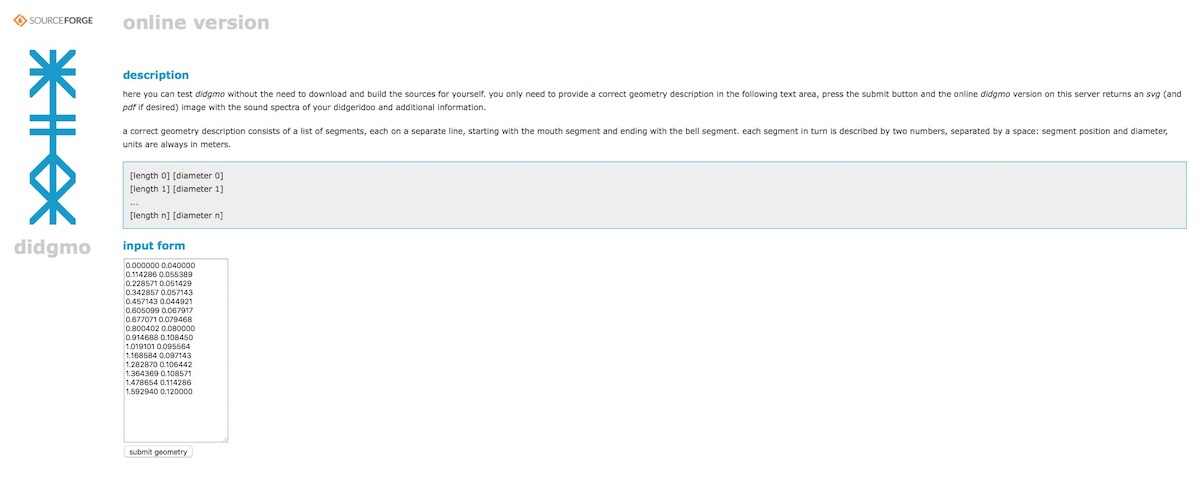
DidgMo home page
On this first page, what interests us is the “Input form” box containing the future dimensions of our didgeridoo. In the default example, there are a lot of these dimensions, 15 lines in total! Let’s take the first two lines as an example to explain them:
0.000000 0.040000
0.114286 0.055389
The left column gives the lengths of the different sections. The right column gives the diameter of the instrument. So in our example, the left column of the first line shows 0.000000. We are at the starting point of the didgeridoo, so far so good. Its diameter is 0.040000, which means 40 millimetres.
The next line tells us that the second section starts at 0.114286 metres, that is 11.4286 centimetres. And the diameter goes up to 55.389 millimetres. Got it?
Well, in this example there are a lot of lines, so a lot of sections, with extremely precise figures on top of that. All of this is probably meant to show us how precisely the software calculates. By the way, if you want to see what the instrument described by these figures might look like, just click the “Submit” button. You’ll land on this page:
DidgMo results page
But we’ll come back to that a bit later… Before that, we’ll pick a more accessible example by simplifying the design of the didgeridoo. Here are the dimensions of an air column that you can copy and paste into the famous “Input form” box. These are very common dimensions for a didgeridoo in D. With these dimensions, you make sure you get a good acoustic balance:
0.00 0.040
0.50 0.045
1.00 0.060
1.50 0.070
We’ll keep the dimensions of this didgeridoo for the rest of the article. Once the table is filled in, click “Submit”. We’ll now move on to analysing the sound spectrum of our didgeridoo on the next page.
The results page
This page contains several elements that may look rather obscure at first! But don’t panic, because as often in life, when you look closer it’s not that complicated!
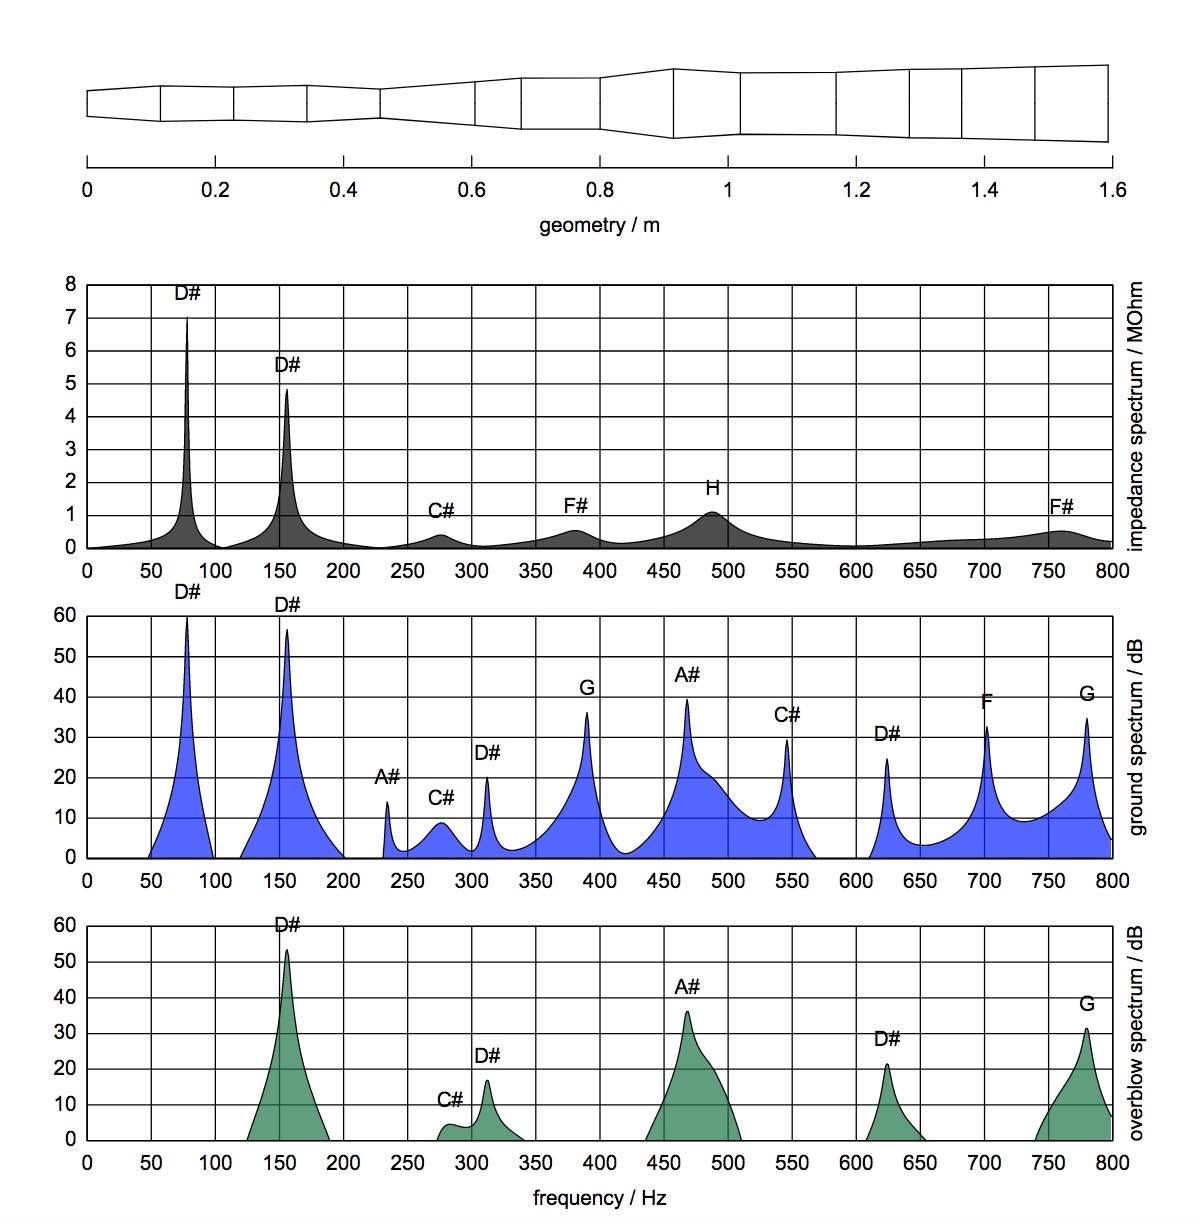
The shape of the didgeridoo
The first element at the top of the page is, logically enough, the model of the shape of your future didgeridoo. Careful, we’re talking here about the shape of the air column and not the outer shape of your instrument (even if the latter will most likely follow the shape of the air column). With the dimensions I gave you, we have a 150 cm didgeridoo, divided into three 50 cm sections. These sections are easy to see, clearly marked out by two vertical lines. For your information, it is commonly accepted that an instrument should be thought of in thirds. I struggled to trace the source of this idea, which is stated out of the blue without much explanation…. But after some research, Bob Druett himself told me he may have been the first to talk about these famous thirds. A little tribute here to one of the too often forgotten pioneers of the contemporary didgeridoo.

Diagram showing a preview of a didgeridoo design by DidgMo
Back to our diagram: it gives us an overall idea of the design of our future didgeridoo and a general view. Here, the air column starts at 40 mm, which is halfway between a narrow air column (30mm) and its opposite, a very open one (50mm). The bell is not too big and the overall taper is rather average.
The 3 frequency graphs
Right after the model of the didgeridoo, you can see 3 charts showing frequencies. Here, if you don’t know the logic, it really looks obscure! But don’t worry, because we find explanations in Frank Geipel’s chapter from the book “The Didgeridoo Phenomenon”. I’m not a physicist at heart and my English is still very limited, but I’ll try to quickly explain what all this means. May the scientists (and Franck!) forgive me for my sometimes excessive approximations!
Graph 1: the impedance peaks
The first graph shows us the impedance peaks of the sound. These are a series of frequencies that can resonate with the drone of the didgeridoo. In other words, the sound of our future didgeridoo will resonate more where these impedance peaks are (Edit: Thank you Colas and David Defois for your valuable input).
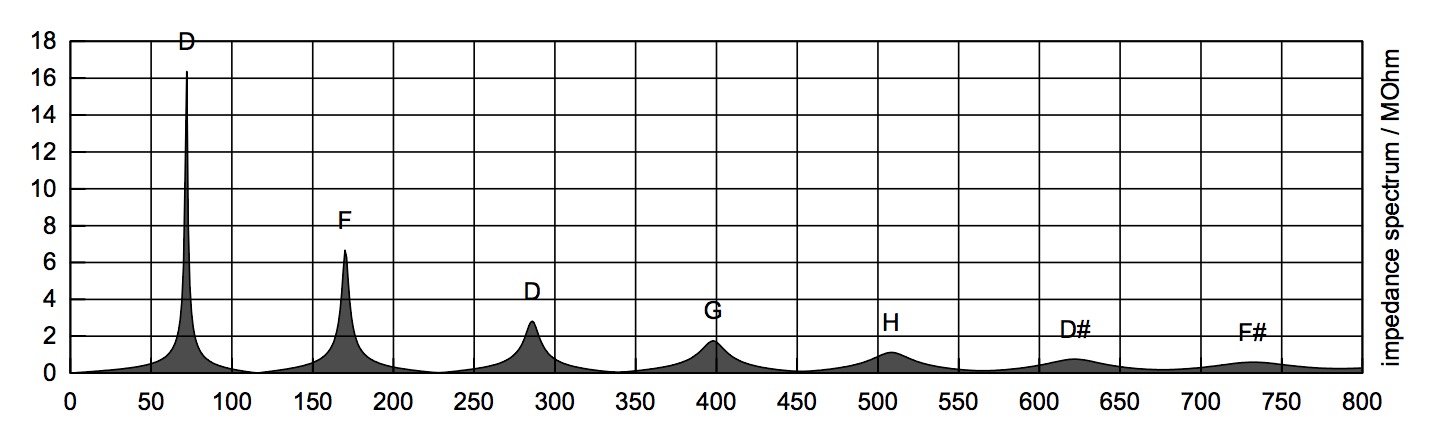
First graph showing the impedance peaks of the future didgeridoo.
Above the first impedance peak from the left, you can read the letter D. This letter tells us that our future didgeridoo will have its fundamental in D (D is the note called Ré in French notation). This is the bass, the strongest frequency in the sound of a didgeridoo. Then we have the frequencies F, D, G…
These black peaks are the resonance points of your didgeridoo but also its overblows. The higher a peak, the easier the overblow will be to play. So the second peak (F) shows us the first overblow, then the second the first overblow, the third the second… etc
With the second graph, we’ll see how this plays out with the drone.

Note names in French / English notation (Source).
Graph 2: The drone of the didgeridoo
Graph 2 reproduces the drone of your future didgeridoo; the frequencies are expressed in decibels (sound volume). A didgeridoo will be more or less powerful depending on its shape. There are many examples in the famous book “The didgeridoo phenomenon”. I lack the physics knowledge to go into detail. So I’ve chosen to explain, in a down-to-earth, practical way, what I understood from reading the book and from looking at the didgeridoo configurations I’ve started to research.
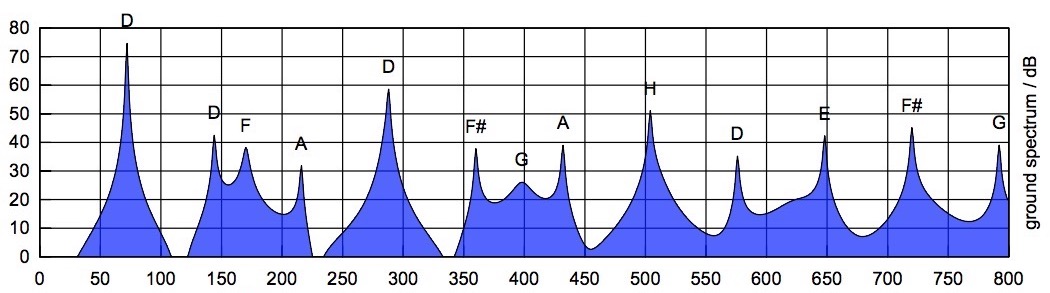
Second graph showing the frequencies of the drone.
So we find the first peak on the left (D), matching the D of the first graph. This confirms that our didgeridoo will have its fundamental in D. Nothing surprising so far, since we already knew that. But what comes next is much more interesting…
Remember the article I wrote about didgeridoo frequencies and singing didgeridoos? (read also: Why analysing your didgeridoo’s frequencies will help you play better!). Well, this is where it all happens, because in graphs 1 and 2 we have the frequencies we can boost or reduce when designing the instrument! To see this, let’s lay our two charts on top of each other to better understand how they match.
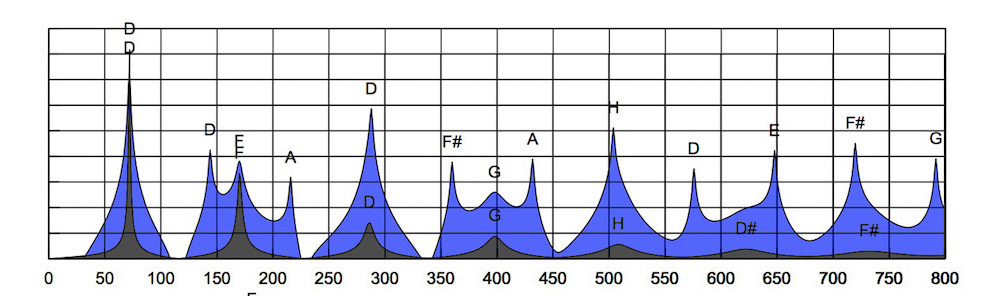
The first two graphs on top of each other
Remember what comes next. Every frequency peak (blue) that lines up with a resonance frequency (black) will come out easily. These matches are therefore the ones to favour when designing your didgeridoo. It’s up to you to see what you’re looking for!
So in our example, we have:
- The first peak in D boosted (nothing new here, we have our fundamental in D)
- The third frequency F (blue) falls on the F (black), so it resonates with the natural harmonics.
- Same for the fifth frequency (D), the seventh (G), the ninth (H)…
On the other hand, the second frequency (D), as well as the fourth (A), fall between two peaks. They won’t fully resonate with the natural harmonics of our didgeridoo, which makes them less interesting.
The 40 Db rule
On top of all this comes a very important rule… The 40 decibel rule. In his chapter on the physics of the didgeridoo, Franck Geipel explains that below 40 decibels, a frequency will be masked by more powerful frequencies. I drew the red line to mark these 40 decibels. So you can see more easily that the first frequency (D), as well as the fifth (D), and also the ninth (H, weaker) will stand out from the drone. The others will add to the colour of the tone but won’t stand out from it. It’s in the combination of these two graphs that everything happens! On their own, they determine the colour of your instrument and part of its playability.
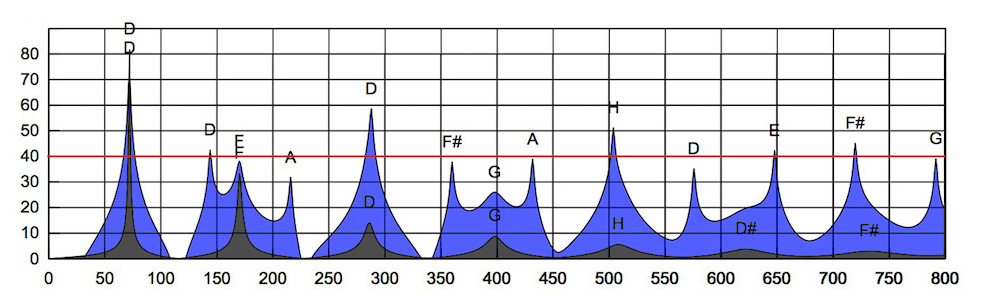 The 40 db line, showing the frequencies that stand out from the drone
Chart 3: The first overblow
Edit: Thanks to Colas for these clarifications
Finally, the last chart shows us the detail of the frequencies of the first overblow (the trumpet sound). To be honest, I still haven’t really understood why makers insist on tuning the overblows. But I’ll surely end up understanding why one day!
To my mind, it’s much more useful to try to fine-tune the drone of the didgeridoo, its playability, the balance of bass, mids and harmonics, the stability of its fundamental, the cleanness of its attacks… In short, a whole bunch of parameters that are far too often overlooked, and yet are played far more often than the overblows… But maybe all of this is linked?! Surely!
So this chart 3 lets you see the first overblow in detail. At the moment, I don’t really know how to use it. With the first two charts there’s already plenty to do! So here, it’s up to you to find what you can get out of it…! Feel free to comment if you want to add something! ?
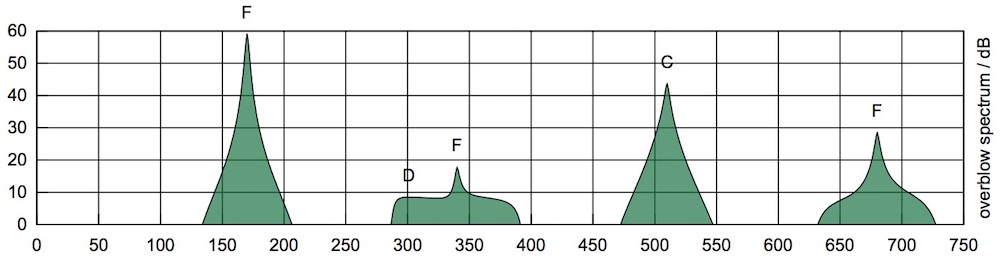
Third and last graph showing the frequencies of the first overblow.
And finally, 4 tables full of numbers!
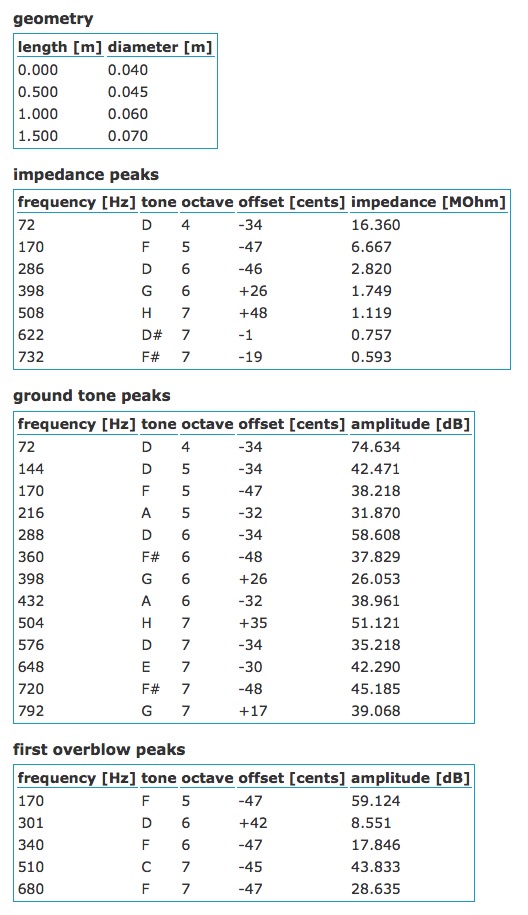
The page ends with numbers sorted into 4 separate tables. The first table reminds you of the dimensions of your didgeridoo. The next 3 tables list all the information from the 3 previous graphs. They give the precise frequency of each peak, its sound volume and other more or less useful information. These tables are great for precisely fine-tuning the note and frequencies of your didgeridoo. With them, you’ll quickly realise that a didgeridoo demands precision like any musical instrument! Acoustics is not up for negotiation. 🙂
• • •
“Alone we go faster, together we go further” African proverb
• • •
Conclusion: from design to making
By now you should understand how to design your didgeridoo. The key now is to play with the different sections, their lengths, their diameters and their number to end up with a didgeridoo whose frequencies resonate in harmony (read also: 4 essential criteria to understand the psychology of your didgeridoo!). Of course, computer design isn’t everything. And once this step is done, you still have to make your instrument (read also: How about making your own didgeridoo?!), choose the wood, decide on its thickness, varnish it or not (read also: Why and how to varnish your didgeridoo?)… In short, there’s still work to do!
Still, spending time on DidgMo can help you get to know your instrument and didgeridoo making in general better. Not to mention that you can learn a lot about the didgeridoo just by observing the frequencies. This kind of software is nothing new; some makers have been using computer design for years. This software can seriously move forward the design of didgeridoos and mouthpieces. So whether you’re a maker, a player who just wants to blow, a seller, a pro player… We all share the same responsibility towards didgeridoo making: let’s demand precision, let’s demand didgeridoos with real research into acoustics and playability. And as players, let’s train our ears and our playing! As you’ve seen, a few millimetres can change a lot. Now you have the tool and the knowledge to check it. Happy researching, everyone!
Dear readers, if you liked this article, share it or comment: it’s always a pleasure to read you and see your interest in my work!


Leave a Reply
You must be logged in to post a comment.